Slot Car Track Layouts
This page features Aurora Slot Car Layouts we designed. We built most of these layouts and some of them are featured in our videos. All of these layouts feature at least one long straightaway section, and some have more than one.
These layouts are about the same overall size. The reason for that is the space we had to work with. We put two flat doors on saw horses to create a nice surface. To make the track look nice we put felt over the doors. We found the felt at a local Hobby Lobby and bought a piece 72" wide by 84" long. We went with the color "Kelly Green" as it seemed to look the nicest.

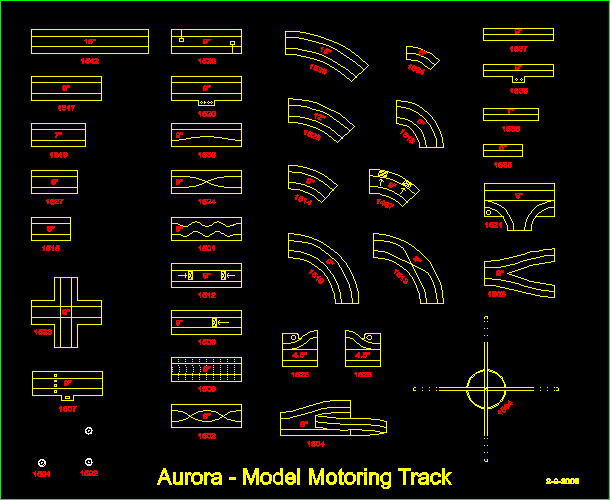
This document features many of the popular Aurora - Model Motoring track components and their part numbers.

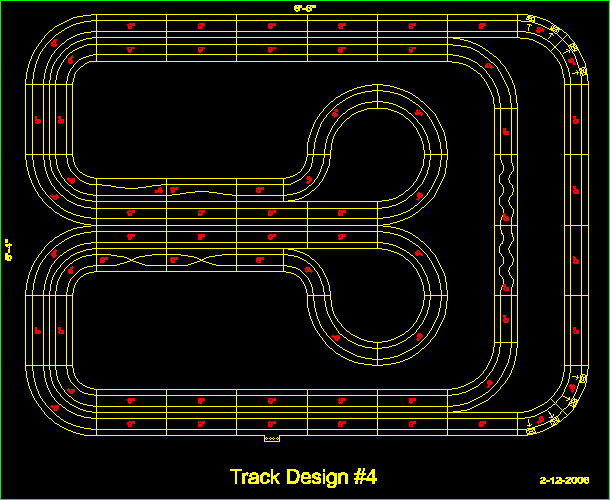
This track features a Monza Banked Curve before a long straightaway. There are also a series of Crossover tracks, Squeeze tracks, and Wiggle tracks which require careful driving! There is also a long-elevated section.

This track is similar to Track #1 with a couple of Curved Crossover tracks added. The Curved Crossover tracks take a little time to get used to and great care is required.

This track features an Intersection track in the middle. There is a four-track section of straight and curved Crossover tracks as well half Monza Bank Curves in turns one and two. Also, a Hump track!

One of the main features of this track are dual Intersection tracks in the middle. There is also a long-elevated section.

This track has Wiggle tracks, Squeeze tracks, Crossover tracks in various locations. Careful driving is required! Also, a long-elevated section.

This track is similar to others, however, the traffic on the long straightaway in the back is going the other direction than the layouts.

This track features a section of track that is on a 45° angle from the rest of the layout. The angle track was the purpose for this experiment. This track also includes some 12" and 15" radius curves.

This is a very fun track because it's fast. There are several larger 12" and 15" radius curves included in this layout. It's amazing how much faster you can go in a 15" radius turn! Barely have to slow down!

This track is similar to Track #9 and is also fast! Love the 12" and 15" radius curves! If you don't have large radius curves you can adjust the layout for 9" radius turns.

This track was an experiment to get four straight tracks side by side. It's weird to drive on because there are eight lanes overall, and every other individual track features traffic going in the opposite direction. It almost looks like there would be head-on collisions, but of course that wasn't the case. The toughest part was the short 6" radius curve tracks which are a pain.

This track features an Intersection almost in the middle with a couple Squeeze tracks and Crossover tracks.

This track features a couple "Y" tracks which are fun. There are also several elevated sections of track.

This track features a couple sections of tracks at an angle, along with a Bridge track! There are also some fast turns and a couple "Y" tracks.

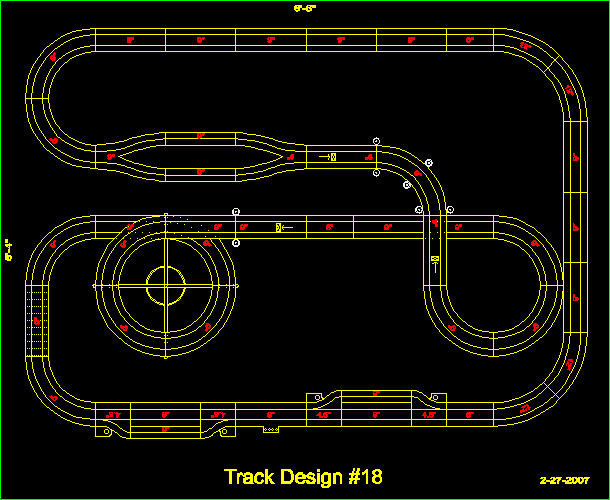
This track has a lot going on, including two elevated "Y" tracks with Single lane tracks in between! There are also two Cobblestone tracks.

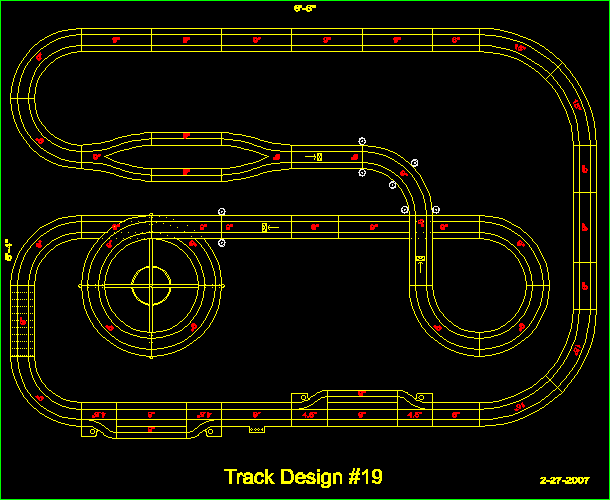
This track was never actually built. As you can see, there is a huge gap in the track. It's possible two 6" straights could be used in place of the one 9" straight to try to close the gap. The angle tracks introduce some weird gaps. There is some flexibility to close tracks, but some gaps cannot be resolved if the tracks are not aligned close enough.

This track features a Cobra turn track! There are also two "Y" tracks with Single lane tracks in between. This is a fun track.

This is a fun track. It has 15" radius turns at the front and 12" radius in turns two and three. Several of our videos and pictures were filmed with this track.

This track is also a fun one. Very fast turns in the outside corners, the Intersection track in the middle, a Bridge track, and a couple "Y" tracks. Several of our videos and pictures were filmed with this track.


